Using a Histogram to Edit | Charlotte Photo Editing Mentor
I began knocking a significant of time off of my editing when I took the time to understand a histogram and the amazing feature of Lightroom that allows you to edit directly from it. Take, for instance, this histogram:
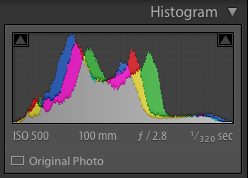
This represents a well-exposed image. There is a nice blend of highs and lows gathered mostly in the middle of the histogram. If the image is underexposed, the histogram would be gathered toward the left. The opposite would be said for overexposed images, which would have a histogram gathered toward the right.
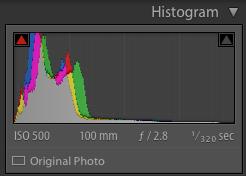
UNDEREXPOSED HISTOGRAM
OVEREXPOSED HISTOGRAM
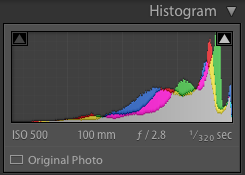
In photography, neither of the above two examples are ideal. However, if you would happen to have made one of these two mistakes, make sure you’re underexposing rather than overexposing. When you overexpose an image, you are clipping vital parts of your images which you cannot recover. It’s much easier to recover from an underexposure than an overexposure.
Next, take your curser and hover over the histogram in Lightroom. You see how a label pops up at the bottom, and a section is highlighted? That is indicating what you will be editing. There are five parts to a histogram: Blacks, Shadows, Exposure, Highlights, and Whites. Each are important in their own way, but I don’t always make adjustments to each for every single edit.
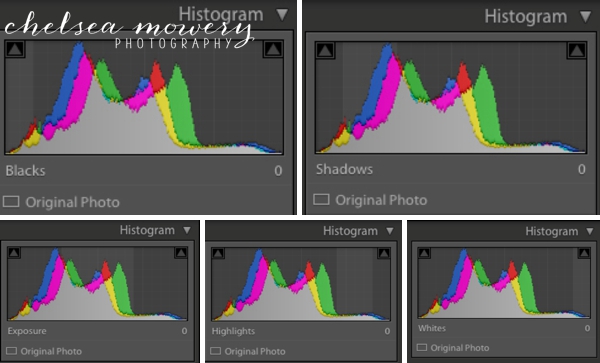
To adjust each section, simply hover, click and hold the section you would like to edit, then drag your curser left or right. You will see real-time adjustments on your image as you move the curser. Yeah, it’s that simple. =)
ORDER OF OPERATION:
EXPOSURE
First, I adjust my Exposure. It’s pretty straight forward. Drag the exposure to the left or right until it’s pleasing to your eye. Try to aim for that evenly dispersed histogram shown at the beginning of this post.
SHADOWS & HIGHLIGHTS
Then I adjust my Shadows and Highlights (if needed). These two elements are what will give your images depth. Making adjustments to either one of these may mean that you will also have to adjust your Blacks and Whites. For example, I like to lighten my shadows for portraits. But when I do this, it takes away some depth in my image. To counterbalance this, I will darken my Blacks a tad in order to add back some more contrast and create the illusion of depth.
BLACKS & WHITES
Lastly, I will adjust my Blacks and Whites. These two elements are what will add contrast to your image. Ideally, you don’t want to be clipping either one of these in an image. Pure blacks and pure whites, typically, are not as pleasing to the eye in photographs. To make sure you are not clipping either one of these when you are making your adjustments, hold down on the ALT (Windows) or OPTION (Mac) key while you are adjusting it and you will be shown the areas that may be getting clipped.
That is Editing with a Histogram in a nutshell. You did it! It’s simple, it’s fast, and those are key to developing a faster workflow! This is simply just my opinion on how the order of your editing should look. However, do what works best for you! The key is to be consistent with however you set up your workflow.
If you enjoy our editing tips, subscribe to our blog to receive updates via email with new ways to become a better photo editing machine! Share the love by following us on Instagram, Facebook, and Pinterest. Get in touch! We would love to help you with your photo editing skills with our Editing 101 mentoring classes customized to meet your specific needs!