Using Saturation Sliders in Lightroom | Charlotte Photo Editing Mentor
Let’s talk about Saturation for a minute. Saturation is a feature I seldom use to increase color in an image. Instead, I use it for the complete opposite. Saturation is a tool that will increase the intensity of every single color in your image. It knows no boundaries. If you would like a nice alternative to Saturation that will keep the colors in your photos at a more even keel, give Vibrance a shot. Unlike Saturation, Vibrance can determine which colors in an image are more dull, and increase their intensity first without affecting the already vibrant colors.
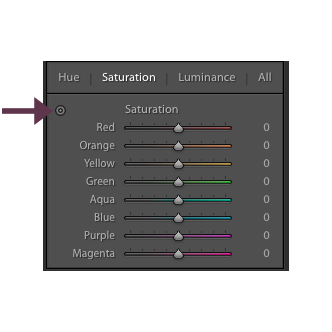
When I use the Saturation slider, it’s usually because I want to adjust my skin tones a bit. I typically only work with the warmer tones (yellows, oranges, and reds). However, sometimes I need more flexibility when choosing which colors or tones to dull down. Lightroom has a handy dandy little tool that lets you select specific areas on the image itself to adjust a very specific color range. To do this, (in the Develop module in Lightroom) find your Saturation slider on the Adjustments panel to the right side of your Lightroom program window.
Next, find this little icon, and click it once.
You’ll see your curser change into crosshairs when you hover over your image. Now just click and hold on an area of your image and drag your curser up or down. See how it changes just a specific color? Neat, huh? To end using this tool, just click the icon again, and continue editing as usual.
This is just a super simple and quick way to knock off just a little bit more time from your editing workflow. For more tips and tricks on Photo Editing and Retouching, subscribe to our blog to receive emails when it’s updated! You can also follow us on Instagram, Facebook, and Pinterest! Share the love by sharing our work!