Quick Edit Checklist | Charlotte Photographer
A “Quick Edit Checklist” is something that many photographers struggle to develop for their editing workflow. It takes time, patience, and a clear vision as to how you would like your photography to speak to your ideal client, but it’s a necessary battle to face in order to optimize your workflow. Today, I’m going to take you through my “Quick Edit Checklist” to help get you on the right track to streamlining your editing and knocking some hours off. Take note that this takes time. Even once you get your editing style down, it will take some time before you develop the speed. But for now, concentrate on your movements, your style, and keeping your work consistent.
I am a natural light photographer, which automatically presents challenges when editing. To prevent inconsistent lighting in your images, choose a location that offers plenty of shade. Don’t be afraid to shoot in the shade! A common misconception with photography is that we need plenty of light. It’s not the amount of light that matters so much as the quality of the light. Placing your subjects in direct sunlight is not going to achieve an image that’s pleasing to the eye. If you have no shade, consider using a reflector as a diffuser to create a softer light. If you are photographing a family, the reflector just isn’t big enough. In this case, find the one side where the light is less intense and use that to your advantage. Even in midday sun. there will always be one side that is getting less direct sunlight.
I’ll be walking you through my editing process for a family session that was shot in the shade around 6pm.
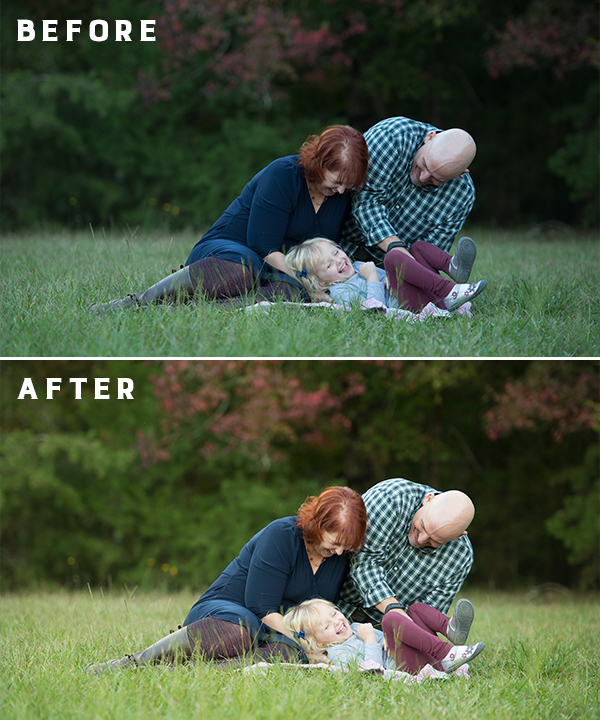
NIKON D610 ISO500 150MM F/2.8 1/500SEC
I shoot in RAW all the time. You don’t have to, but if you’re just starting out in photography, and would like to have the most control over your images in post-processing, I suggest you at least begin in RAW. Many photographers switch back to shooting in JPG when they become confident with their shooting style and are able to produce consistent results in-camera. This will also save you a ton of hard drive space. 😉 I could be shooting in JPG, but I’m stubborn and don’t like certain things in life to change. But moving on…
The sun had fallen behind the trees you see in the background. But that’s totally okay! In general, there was still plenty of sunlight to work with (in the form of shade). I know that doesn’t make any sense, but just trust me. By placing my clients in the shade and keeping them there for their entire session, I was able to keep my settings exactly the same from start to finish. It’s a miracle! That’s the advantage of making sure you have consistent lighting for your sessions. It will cut your editing in half or more!
As a side note, I do all of my editing in Lightroom. Very rarely do I bring images into Photoshop unless I need to do some heavy skin retouching or head swaps.
Very first thing I do whenever I begin editing (after culling) is adjust my lighting. #1. Always. Why? Because then you can see things more clearly. Simple, right? Adjust your exposure quickly, then move on. My next few steps are as follows:
- White Balance | Temperature
- Shadows
- Blacks
- Vibrance
- Sharpening
- Adjust skin tones
Now, why that order? It’s simple. It’s the exact order they appear on your adjustments panel (right) in Lightroom. In order to gain speed and cut time, you have to begin thinking smarter, not harder. Keep your adjustments quick, and keep them simple. Do not spend 5 minutes going back and forth between two different levels of black. If you hit a point that looks pleasing, stop! Move on to the next adjustment. Your first reaction is typically the best option.
WHITE BALANCE | TEMPERATURE
My editing style leans more toward the warmer tones, and they typically need bumped up just a tad. I also have learned to shoot in Kelvin, which has helped me achieve the warmth I’m going for in-camera. However, because this image was in the shade, I still needed to bump up the warmth even though my Kelvin was cranked as high as it could go.
SHADOWS
I usually lighten my shadows. I just began doing this, and it has definitely made a difference with skin tones and knocking out any unnecessary dark areas on faces (i.e. eyes, nose, etc).
BLACKS
Because I lighten my shadows, I lose a little bit of contrast. I like to counteract this by darkening the blacks to give my images that little extra pop.
VIBRANCE
A common mistake when photographers are first learning to edit is to take that Saturation slider and bump it up to create a beautifully colorful image. No. Please stop. Let me explain. When you use the Saturation slider, you’re telling the program to bump up the intensity of every single color in the photo. And most times, this is just information overload for our eyes. Instead, I use the Vibrance slider. By using this, you are telling the program, “Hey, there are some colors in my image that are a little dull. I want them to match the rest of the photo.” The Vibrance slider will increase the intensity of the colors that are more dull first. However, there does come a time when those colors begin to match the intensity of the others and then you begin increasing all the colors. I like to stay somewhere in between, usually between 12-20.
SHARPENING
Because I photograph mostly families who are looking to fill their home with my images, I like to increase my sharpening quite a bit more than usual. This ensures that their images are looking just as fantastic hung on their wall, blown up on canvases, as they do on my 27″ computer screen. I usually increase my sharpening to 75.
ADJUST SKIN TONES
After I have done all of that, I will then, and only then, look at the skin tones and adjust only if necessary. I don’t always need to fuss with it. But when I do, I do so by using the Saturation sliders (tutorial coming in a later post). Most times, I am only adjusting the warmer tones (yellows, oranges, and reds). Sometimes, I’ll have to knock out a little green.
So there you have it. A simple plan to get you on the right track to maximizing your time with quick and easy editing. The key is developing a system, and sticking with it. I will be talking about using brush tools to do some fine detail editing in a later post. If you don’t want to miss it, subscribe to the blog to receive emails when it’s updated.
Have more questions? Get in touch with us! We would love to hear from you. We offer Photo Editing Services as well as Mentoring to photographer who are looking to lighten their load and shaving hours off of their workflow.